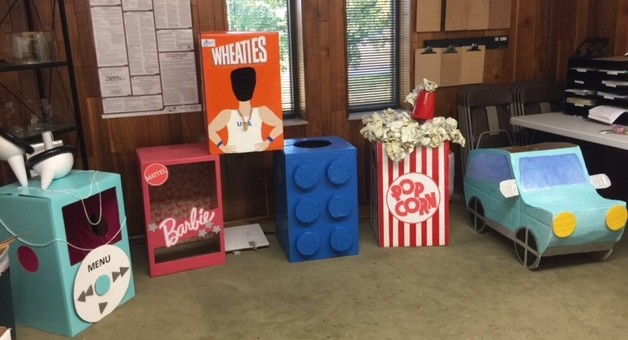
It’s boxtume season! If you’re new here, “boxtumes” are Halloween costumes we like to upcycle from cardboard moving boxes. Not only do you end up with a completely unique costume, it’s also fun for the family and extremely affordable.
We’ve come up with three brand new costumes to make this Halloween season in 30 minutes or less right in the comfort of your living room. Similar to our DIY hot air balloon or Barbie box costume, these can be done in a few simple steps. Halloween costumes don’t get much easier than this!
LEGO BRICK
Materials needed:
TWO MEN AND A TRUCK® dish pack box
Box cutter
Tape
Spray paint of your choosing
6 Craft boxes
Wood glue
Lego logo print out
STEP 1: Cut off the bottom flaps of a box (ours measured 16″W × 29″H × 11″D) with a box cutter. Tape down the top flaps.
STEP 2: To create head and arm holes, trace a dinner plate on the top of the box and saucers on each of the box’s sides, and cut out with the box cutter.
STEP 3: Lay the box flat on its back. Using wood glue, affix six round 2″H x 4″diam. craft boxes ($1.19 each; bjcraftsupplies.com) — without their lids — in two vertical rows along the front, as shown. Make sure the bottoms of the craft boxes face out.
STEP 4: Once the glue has dried, spray-paint the entire piece. If necessary, coat multiple times for a brighter color, then let dry.
STEP 5: Glue Lego logo to the back.
WHEATIES BOX
Materials needed:
TWO MEN AND A TRUCK® dish pack box
Orange paint
Wheaties and General Mills printable
Skin tone colored paint
White and blue paint
Spray adhesive
Tape
Plastic gold medal
Yellow paint pen
Box cutter
Rope
Step 1: Tape the top of the box. This will make it easier to cut out the front design.
Step 2: Sketch out the circle for the face, and us a box cutter to cut out the oval.
STEP 3: Pray paint the entire box orange.
STEP 4: Use your creative side to paint the body on to the box. The athlete can be doing whatever you would like.
STEP 5: Glue Wheaties and General Mills logo onto the box
STEP 6: Use yellow paint pen to write “The breakfast of champions.”
STEP 7: Cut and glue medal around the neck of the body.
STEP 8: Attach rope on the inside to create straps for the child’s shoulders.
IPOD and HEADPHONES
Is your kid a music fanatic? With a little paint, some artistic talent, and a few supplies found around your home, you can easily create an iPod costume for your budding musician.
What you need:
A TWO MEN AND A TRUCK® Dish Pack Box
Spray Paint (color of your choice)
White Paint
Silver paint
Extra cardboard
Paper towel cylinder
Print out of the word MENU
Spray adhesive
White Rope
Half circle, ring, and cone Styrofoam pieces
Black duct tape
Hot glue
Tape
Ruler
Box cutter
Step 1: Tape the top of the box. This will make it easier to cut out the front design.
Step 2: Sketch out the box design. Make sure to leave designated areas for the Mattel and Barbie logos.
Step 3: Use the box cutter to cut out the design, arm holes, and bottom box flaps.
Step 4: Take the box to a well-ventilated area to spray paint.
Step 5: Use the box cutter to cut out a large and small circle.
Step 6: Paint the larger circle white and the smaller circle the same color as the box.
Step 7: Once dry, use the silver paint to add the play and next buttons to the circle
Step 8: Cut out the MENU print out and use spray adhesive to attach it to the larger circle.
Step 9: Glue the larger circle on to the box and then the smaller circle onto the larger circle
Earbuds
Step 1: Cover front of the Styrofoam ring with black duct tape
Step 2: Hot glue the ring, half circle, and cone together.
Step 3: Glue white rope to each earbud
Step 4: Attach earbud string to paper towel cylinder and hot glue paper towel cylinder to the top of the box
CAR
Materials needed:
TWO MEN AND A TRUCK® mirror boxes
TWO MEN AND A TRUCK® small box
Spray paint of your choosing
Black duct tape
Silver paint
Masking tape
Blue paint
Black paint pen
Box cutter
Suspenders
Tape
Glue
Yellow paint
STEP 1: Cut open mirror boxes and sketch out design of the car.
STEP 2: Use a box cutter to cut out 2 pieces of the car design.
STEP 3: Use extra cardboard to cut out 4 medium size circle for the wheels.
STEP 4: Cut all the flaps off of the small box.
STEP 5: Attach the car sides to the small box to build the frame of the car.
STEP 6: Use another mirror box to create the front of the car. Cut to the correct width and bend and curve to attach using masking tape to each side of the car.
STEP 7: Spray paint the car in a well ventilated area.
STEP 8: While the car is drying, take the four circle and cover them in black duct tape.
STEP 9: Use silver paint to create rims for the tires.
Step 10: Once the car is dry, attach tires to the car with tape or glue
STEP 11: Use blue paint to add windows to the car.
STEP 12: Use scrap pieces of cardboard to create bumpers, headlights, and rearview mirrors.
STEP 13: Paint bumpers mirrors silver and paint headlights yellow.
STEP 14: Attach these pieces with tape or hot glue.
STEP 15: Use a black paint pin to create detail such as doors.
STEP 16: Attach Suspenders to the small box a straps for the child’s shoulders.


